2023-07-25-How to use NLP
How to use NLP
Contents :
데이터 소개
이 데이터는 트위터 내에서 이루어졌던 고객지원 계정과 관련된 트윗 데이터에 대한 500MB짜리 csv라는 어마어마한 데이터셋으로 이루어져 있다.
여러 회사 (애플, 테스코, 항공사)들의 데이터가 Q&A 형식으로 되어 있기 때문에 질문에 대한 내용과 답변에 대한 내용이 한 계정에서 이루어지지 않고 불특정 다수의 데이터로만 이루어져 있다.
이 데이터를 통해 시각화와 openAI API를 이용한 finetuning을 진행할 예정이다.
spacy + scatterText
먼저, 기본적인 텍스트 데이터에 대한 전처리 작업을 진행해야 하므로 텍스트 데이터에 대해 전처리 작업을 통해 필요한 데이터만 가져다가 진행할 필요가 있다.
이를 처리하기 위한 라이브러리로 spacy를 소개한다.
라이브러리 소개
spaCy는 파이썬 기반의 NLP 라이브러리로 거대한 텍스트 데이터를 위한 분류기 및 전처리 겸 모델이다.
entity recognition, part-of-speech tagging, dependency parsing, sentence segmentation, text classification, lemmatization, morphological analysis, entity linking 이런 것들을 수행할 수 있다고 하므로 데이터를 전처리 할 필요가 있다. 다만, 이유는 모르겠는데 프로세싱에 대한 멀티 코어 옵션이 기본적으로 들어가 있지는 않은건지 pipeline을 집어넣으면 코어 1개 이상을 사용하지는 않으니 참고
전처리 과정
%pip install scattertext
%pip install spacy_cld
%pip install spacymoji
%pip install empath
%pip install spacy_langdetect
%pip install matplotlib
%pip install TextBlob stopwords
혹시라도 설치가 안된 라이브러리들이 있으면 설치
# library imports
import re
import numpy as np
import pandas as pd
import matplotlib.pyplot as plt
plt.style.use('ggplot')
width = 0.75
plt.rcParams['xtick.labelsize'] = 15
plt.rcParams['ytick.labelsize'] = 15
plt.rcParams["font.weight"] = "bold"
plt.rcParams["axes.labelweight"] = "bold"
plt.axis('off')
from nltk.corpus import stopwords
from textblob import TextBlob
import scattertext as st
import spacy
import spacy_cld

from IPython.display import IFrame
from IPython.display import display, HTML
from collections import Counter
from tqdm import notebook as tqdm  # cool progress bars
tqdm.tqdm_notebook() # Enable tracking of progress in dataframe `apply` calls
tqdm 설정을 하면 진행도를 시각화하여 볼 수 있다. 주의사항: X11-forwarding 쓰므로 쉘에서 실행할 때 쉘에 기능이 없으면 약간 곤란하다.
tweets = pd.read_csv('twcs.csv',encoding='utf-8')
print(tweets.shape)
tweets.head()
first_inbound = tweets[pd.isnull(tweets.in_response_to_tweet_id) & tweets.inbound]

QnR = pd.merge(first_inbound, tweets, left_on='tweet_id',
                                  right_on='in_response_to_tweet_id')

# Filter to only outbound replies (from companies)
QnR = QnR[QnR.inbound_y ^ True]
print(f'Data shape: {QnR.shape}')
QnR.head()
데이터를 읽고 형태를 확인해본다. 쓸모 없는 애들은 이제 다 지워야 한다.
# removing anonymized screen names
def sn_replace(match):
    _sn = match.group(2).lower()
    if not _sn.isnumeric():
        # This is a company screen name
        return match.group(1) + match.group(2)
    return ''

sn_re = re.compile('(\W@|^@)([a-zA-Z0-9_]+)')
print("Removing anonymized screen names in X...")
QnR["text_x"] = QnR.text_x.progress_apply(lambda txt: sn_re.sub(sn_replace, txt))
print("Removing anonymized screen names in Y...")
QnR["text_y"] = QnR.text_y.progress_apply(lambda txt: sn_re.sub(sn_replace, txt))
count = QnR.groupby("author_id_y")["text_x"].count()
c = count[count>15000].plot(kind='barh',figsize=(10, 8), color='#619CFF', zorder=2, width=width,)
c.set_ylabel('')
plt.show()
spacy pipeline
pipeline 설정은 @Language.factory 설정으로 잡아야 하는데, 이름 중복되면 실행 안되고 여러 이유로 실행이 안되므로 두 번 실행하려고 하지 말 것
nlp_cld = spacy.load('en_core_web_sm') ## 영어 데이터의 경우 사용하는 모델 (spacy 3.x 기준)
from spacy_langdetect import LanguageDetector
from spacy.language import Language

@Language.factory('cld_language_detector')
def language_detector(nlp, name):
    return spacy_cld.LanguageDetector()

language_detector = spacy_cld.LanguageDetector()
예시에서는 AppleSupport와 관련된 데이터를 사용한다.
AppleQnR = QnR[QnR["author_id_y"]=="AppleSupport"]
doc = nlp_cld(AppleQnR.iloc[100]["text_x"])

print(doc)
print(doc._.languages)
print(doc._.language_scores)
## 영어만 걸러내는 코드
from tqdm import tqdm_notebook


mask = []
try:
    for i,doc in tqdm_notebook(enumerate(nlp_cld.pipe(AppleQnR["text_x"], batch_size=512))):
            if 'en' not in doc._.languages or len(doc._.languages) != 1:
                mask.append(False)
            else:
                mask.append(True)
except Exception:
    print("excepted ")
## 영어가 잘 출력되면 성공
AppleQnR = AppleQnR[mask]
# sample a random fraction to visually ensure that we have only English tweets
AppleQnR.sample(frac=0.0002)
AppleQnR.tail(10)["text_x"]
spacy.cli.download("en_core_web_lg")
다른 전처리 작업도 진행해야 하므로 해당 모델을 다운로드. 간단하게 이미지만 추출해서 감정 빈도수를 확인할 예정이다.
from spacymoji import Emoji
@Language.factory('emoji3')
def language_detector(nlp, name):
    return Emoji(nlp)
nlp = spacy.load("en_core_web_lg")

emoji = Emoji(nlp)
nlp.add_pipe('emoji3', first=True)
참고로 factory를 만들 때 새로운 모델을 넣고자 한다면 이름을 1-2-3 이렇게 하나하나씩 올려야 한다. 이름 중복되면 안받아준다. 그리고 모델을 꼬이게 넣었다면 spacy 문서를 확인해서 너무이상하게 파이프에 들어가지는 않았는지 꼭 확인하기;
emojis = []
for doc in tqdm_notebook(nlp.pipe(AppleQnR["text_x"], batch_size=512, disable=["tagger"])):
    if doc._.has_emoji:
        for e in doc._.emoji:
            emojis.extend(e[0])
eCount = Counter(emojis)
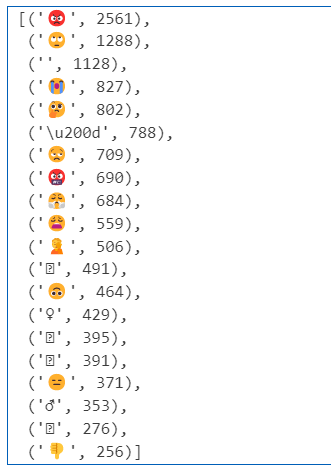
eCount.most_common(20) ## 이모지 상위 20개 출력하기
참고로 applesupport 기준 출력은 이렇습니다.
..
시각화
여러 방법으로 처리한 데이터들을 이제 시각화 할 때가 왔는데, 처리 방법은 일단 QnR이라는 데이터에 모두 넣어서 시각화를 할 것이다.
AppleSupport =QnR[(QnR["author_id_y"]=="AppleSupport")]
AppleSupport.head(4)
import scattertext as st
from spacy.tokens import Doc
@Language.factory('language_detector')
def language_detector(nlp, name):
    return LanguageDetector()
nlp = spacy.load('en_core_web_lg',exclude=['tagger', 'ner'])

nlp.add_pipe('language_detector')
print(nlp.pipe_names)
AppleSupport['parsed'] = AppleSupport.text_y.progress_apply(nlp) 실행하면 진행도가 안나갈 수도 있지만 기다리면 작동함
corpus = st.CorpusFromParsedDocuments(AppleSupport,
                             category_col='author_id_y',
                             parsed_col='parsed').build()
html = st.produce_scattertext_explorer(corpus,
          category='AppleSupport',
          category_name='AppleSupport',
          width_in_pixels=600,
          minimum_term_frequency=10,
          term_significance = st.LogOddsRatioUninformativeDirichletPrior(),
          )
# uncomment this cell to load the interactive scattertext visualisation
filename = "applesupport3.html"
open(filename, 'wb').write(html.encode('utf-8'))
IFrame(src=filename, width = 800, height=700)
## IFrame의 경우 상당 부분 실패하는 경우가 많으므로 저장된 파일 그냥 가져다 여는게 좋음
## 파일이 꽤 큽니다.

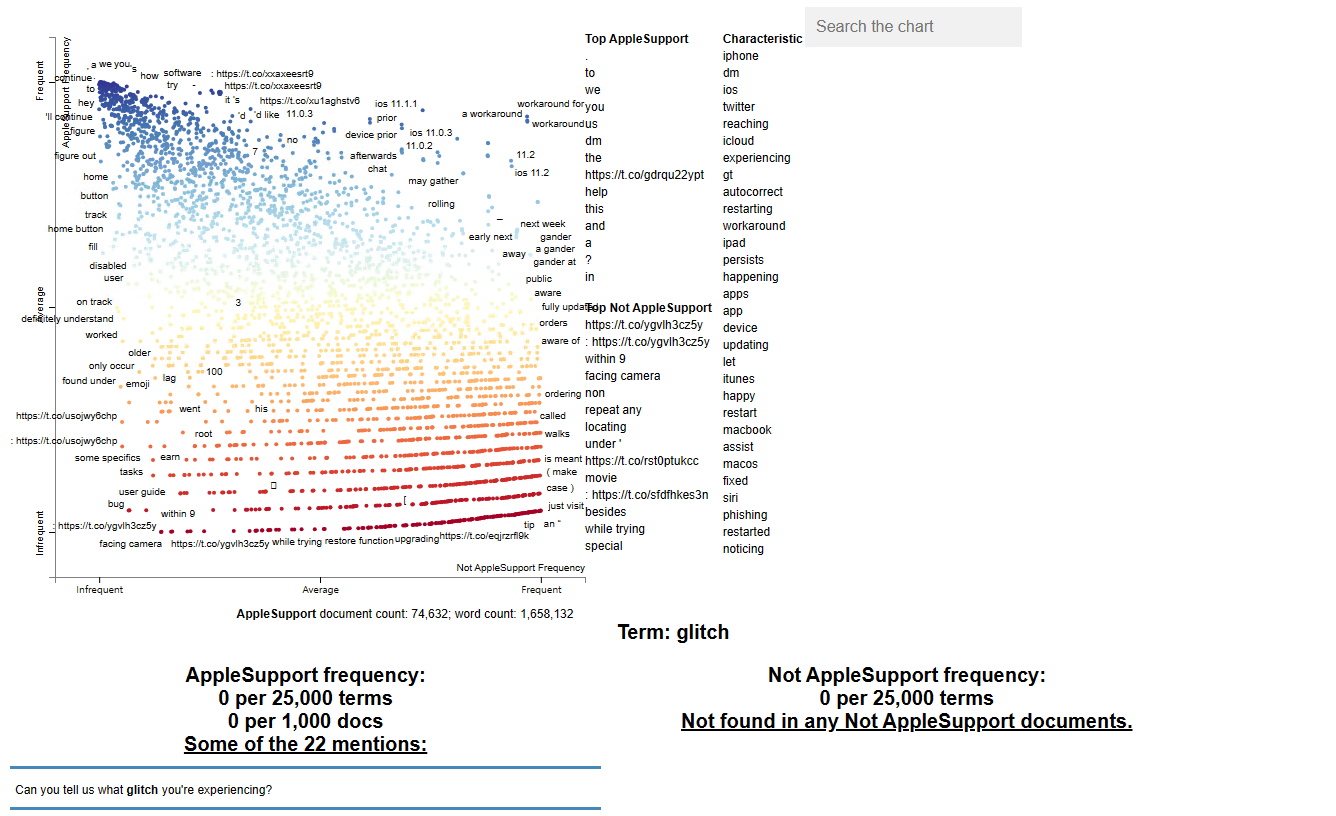
전처리를 통해 위와같은 결과가 나오면 성공, 비교를 위해 2개의 process를 진행할 수도 있다. 관련 내용은 https://www.kaggle.com/code/psbots/customer-support-meets-spacy-universe 참고
openAI api
openAI API를 사용하면, 간단하게 데이터를 넣어 finetuning을 진행할 수 있게 된다.
가격 정책
꼭 확인해야 할 부분
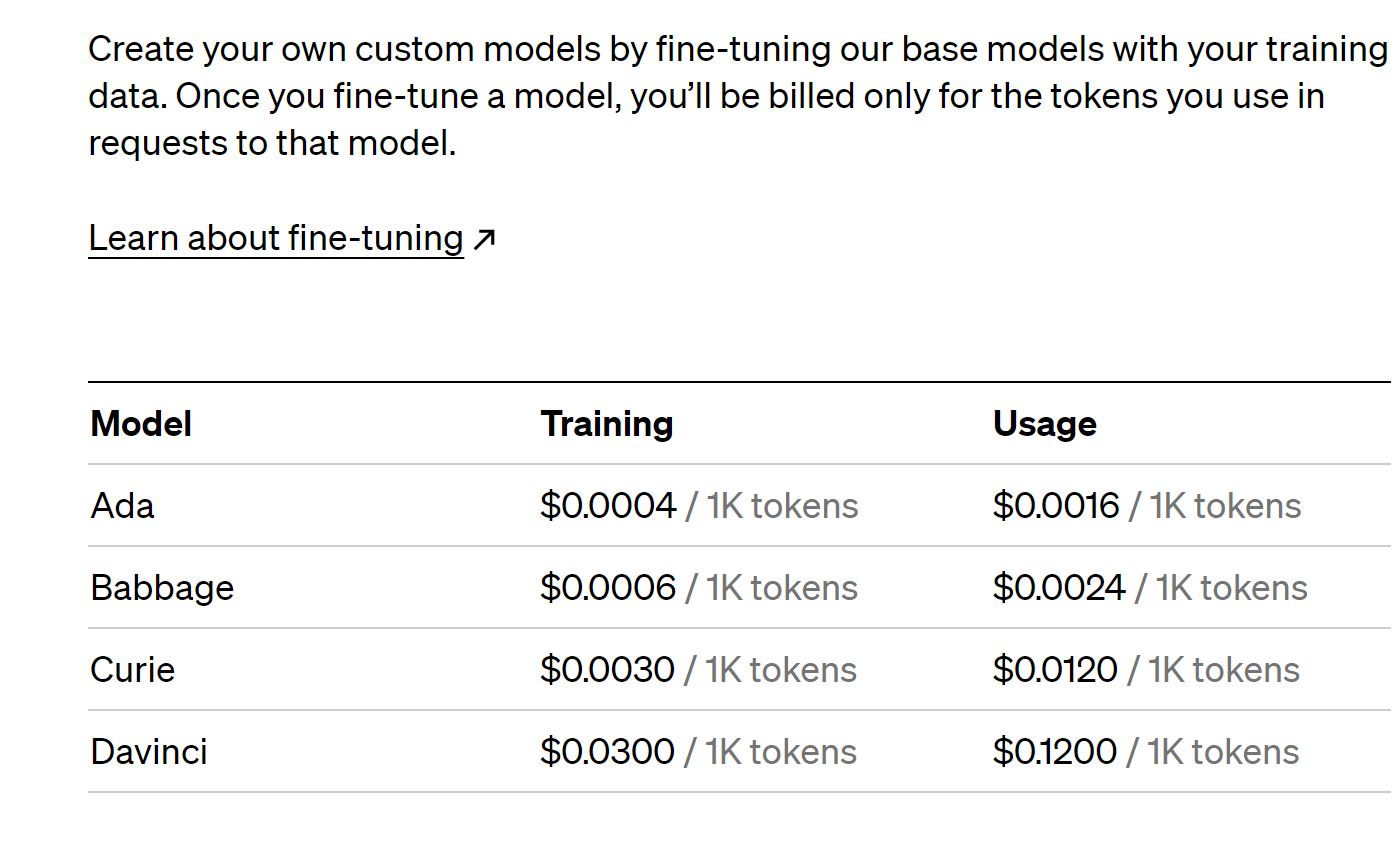
finetuning 모델은 학습과 사용에 따른 비용이 들어가는 만큼, 사용에 주의를 요한다. babbage 모델로 진행하는 편이 좋다.
무턱대고 500MB 분량의 데이터를 넣는 경우 무지막지한 청구서가 나오게 되므로 금액 제한을 걸어서 과다하게 입력하지 않도록 주의
데이터 입력 및 출력
다른 용도로 쓰인 import도 있으므로 필요한 것만 넣어도 무방하다. 코드가 좀 어지러워서 그냥 다양한 방법으로 전처리 할 수 있으니 관련된 캐글 프로젝트 목록을 확인해서 전처리한 csv를 import 해주는게 좋을듯 https://www.kaggle.com/datasets/thoughtvector/customer-support-on-twitter/code?datasetId=4133&sortBy=voteCount 여기에서 어떤 식으로든 전처리 해서 나온 csv를 입력해보는 것을 추천한다.
import numpy as np
import pandas as pd
import re
import nltk
import spacy
import string
pd.options.mode.chained_assignment = None

full_df = pd.read_csv("twcs.csv", nrows=50000)
df = full_df[["text"]]
df["text"] = df["text"].astype(str)
full_df.head(50)
# Importing the required libraries
import nltk
from nltk.stem import PorterStemmer
from nltk.stem import WordNetLemmatizer
from nltk.tokenize import sent_tokenize, word_tokenize
nltk.download('punkt')
nltk.download('wordnet')
import gensim
from gensim import corpora
from gensim import models
from gensim.models import LdaModel
from gensim.models import TfidfModel
import pandas as pd
import numpy as np
import seaborn as sns
import re
import nltk
import spacy
import string
import matplotlib.pyplot as plt
from wordcloud import WordCloud, STOPWORDS, ImageColorGenerator
import scattertext as st
from collections import Counter
import re, io
import pyLDAvis
import pyLDAvis.gensim
from sklearn.feature_extraction.text import TfidfVectorizer
from sklearn.decomposition import TruncatedSVD
from pprint import pprint
from scipy.stats import rankdata, hmean, norm
import spacy
import scattertext as st
from sklearn.feature_extraction.text import CountVectorizer
from nltk.corpus import stopwords
import os, pkgutil, json, urllib
from urllib.request import urlopen
from IPython.display import IFrame
from IPython.core.display import display, HTML
from scattertext import CorpusFromPandas, produce_scattertext_explorer
데이터 전처리
full_df = pd.read_csv("twcs.csv", nrows=50000)
첫 5만개 문장만 추려서 데이터를 정제한다.
df["text_lower"] = df["text"].str.lower()
df.head()

# drop the new column created in last cell
df.drop(["text_lower"], axis=1, inplace=True)

PUNCT_TO_REMOVE = string.punctuation
def remove_punctuation(text):
    """custom function to remove the punctuation"""
    return text.translate(str.maketrans('', '', PUNCT_TO_REMOVE))

df["text_wo_punct"] = df["text"].apply(lambda text: remove_punctuation(text))
df.head()
nltk.download('stopwords')
from nltk.corpus import stopwords
", ".join(stopwords.words('english'))
각각 소문자화, 특수문자 제거, stopword 제거( and how have 등등 근 의미를 주지 않는 단어들)
from collections import Counter
cnt = Counter()
for text in df["text_wo_stop"].values:
    for word in text.split():
        cnt[word] += 1

cnt.most_common(10)
FREQWORDS = set([w for (w, wc) in cnt.most_common(10)])
def remove_freqwords(text):
    """custom function to remove the frequent words"""
    return " ".join([word for word in str(text).split() if word not in FREQWORDS])

df["text_wo_stopfreq"] = df["text_wo_stop"].apply(lambda text: remove_freqwords(text))
df.head()
# Drop the two columns which are no more needed
df.drop(["text_wo_punct", "text_wo_stop"], axis=1, inplace=True)

n_rare_words = 10
RAREWORDS = set([w for (w, wc) in cnt.most_common()[:-n_rare_words-1:-1]])
def remove_rarewords(text):
    """custom function to remove the rare words"""
    return " ".join([word for word in str(text).split() if word not in RAREWORDS])

df["text_wo_stopfreqrare"] = df["text_wo_stopfreq"].apply(lambda text: remove_rarewords(text))
df.head()
from nltk.stem.snowball import SnowballStemmer
SnowballStemmer.languages
from nltk.stem import WordNetLemmatizer

lemmatizer = WordNetLemmatizer()
def lemmatize_words(text):
    return " ".join([lemmatizer.lemmatize(word) for word in text.split()])

df["text_lemmatized"] = df["text"].apply(lambda text: lemmatize_words(text))
df.head()
nltk.download('averaged_perceptron_tagger')
from nltk.corpus import wordnet
from nltk.stem import WordNetLemmatizer

lemmatizer = WordNetLemmatizer()
wordnet_map = {"N":wordnet.NOUN, "V":wordnet.VERB, "J":wordnet.ADJ, "R":wordnet.ADV}
def lemmatize_words(text):
    pos_tagged_text = nltk.pos_tag(text.split())
    return " ".join([lemmatizer.lemmatize(word, wordnet_map.get(pos[0], wordnet.NOUN)) for word, pos in pos_tagged_text])

df["text_lemmatized"] = df["text"].apply(lambda text: lemmatize_words(text))
df.head()
def preprocess(CleanText):
CleanText = CleanText.str.replace("(<br/>)", "")
CleanText = CleanText.str.replace('(<a).*(>).*(</a>)', '')
CleanText = CleanText.str.replace('(&)', '')
CleanText = CleanText.str.replace('(>)', '')
CleanText = CleanText.str.replace('(<)', '')
CleanText = CleanText.str.replace('(\xa0)', ' ')
return CleanText
customer['text'] = preprocess(df['text_lemmatized'])
customer['text'].to_csv('processed.csv')
openAI 에 넣기
import pandas as pd
import random

# Load the CSV file into a DataFrame
df_openai = pd.read_csv('processed.csv')

# Shuffle the DataFrame rows randomly and select 50,000 lines
random_sample_size = 5000
df_random_sample = df_openai.sample(n=random_sample_size, random_state=42).reset_index(drop=True)

# Save the modified random sample DataFrame back to a new CSV file
df_random_sample.to_csv('processed_random_sample_shortened.csv', index=False)
import openai

# Set your OpenAI API key
openai.api_key = "{API-KEY}"

# Function to process and interact with a conversation chunk
def process_chunk(conversation_chunk):
    # Split the 'text' data into user IDs and content
    user_ids = [re.findall(r'@(\S+)', msg) for msg in conversation_chunk]
    user_ids = [user_id[0] if user_id else "default_user_id" for user_id in user_ids]
    contents = [re.sub(r'@\S+', '', msg).strip() for msg in conversation_chunk]

    # Create the prompt with user IDs and content
    prompt = "\n".join([f"{user_id}: {content}" for user_id, content in zip(user_ids, contents)])

    response = openai.Completion.create(
        engine="text-davinci-002",  # GPT-3.5 model
        prompt=prompt,
        max_tokens=5  # Adjust as needed
    )

    return response['choices'][0]['text']


# Assuming you have already read the entire CSV into a list called 'all_lines'
chunk_size = 100

# Process the CSV in chunks and collect the assistant's replies
assistant_replies = []
for i in range(0, len(all_lines), chunk_size):
    chunk = all_lines[i:i+chunk_size]
    assistant_reply = process_chunk(chunk)
    assistant_replies.append(assistant_reply)

# Now 'assistant_replies' contains the assistant's replies for each chunk of the conversation.
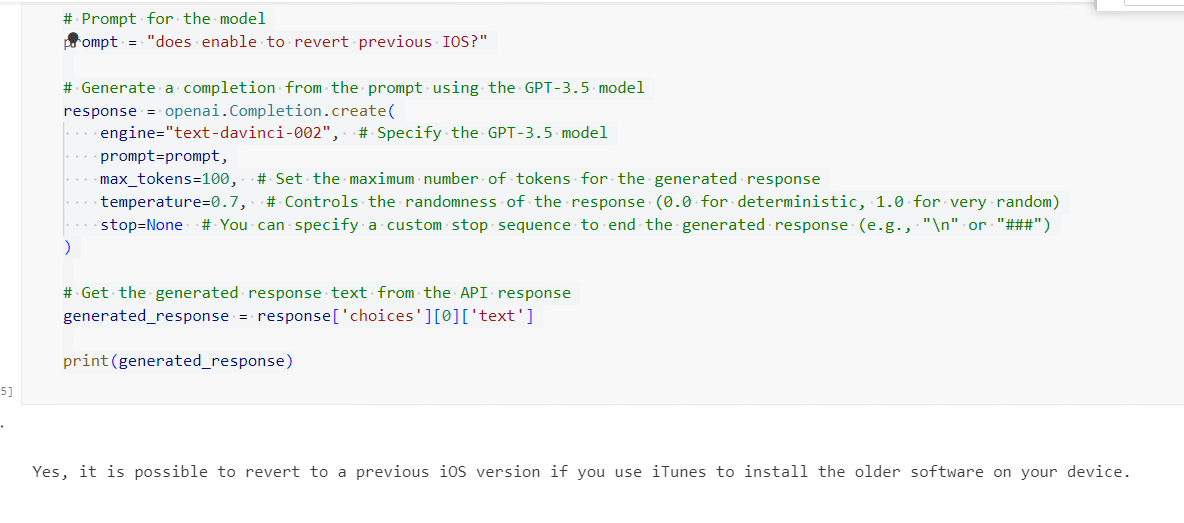
# Prompt for the model
prompt = "how to give a applecare?"

# Generate a completion from the prompt using the GPT-3.5 model
response = openai.Completion.create(
    engine="text-davinci-002",  # Specify the GPT-3.5 model
    prompt=prompt,
    max_tokens=100,  # Set the maximum number of tokens for the generated response
    temperature=0.7,  # Controls the randomness of the response (0.0 for deterministic, 1.0 for very random)
    stop=None  # You can specify a custom stop sequence to end the generated response (e.g., "\n" or "###")
)

# Get the generated response text from the API response
generated_response = response['choices'][0]['text']

print(generated_response)
openAI API 사용시 모델이나 prompt에 사용할 토큰을 조절해 줘야 한다. 특히 finetuning의 경우 입력할 데이터를 잘 처리해야 큰 비용없이 최적화된 모델을 쓸 수 있다.
결론
NLP 모델은 남의거 쓰기엔 비싸고 openai GPT 계열 외에는 여러 다양한 모델들이 나온다. 다만 거대 모델이 가져다 주는 장점 덕분에 finetuning을 api 단위로 제공해주는 서비스는 꽤 눈여겨볼 만한 것이고 프로젝트 에서도 이러한 최적화된 거대 모델을 만드는 건 어떤 방식으로든 도움이 될 듯 하다.